Sunday, July 26, 2015

A Simple Nourishing Meal

I need to buy groceries but it is not time to go yet (pay day cha ching). Time to use what on hand. Tonight that meant a nice salad and a fry up dish I just called "Stuff". It really scares the children when I tell them we are having Stuff for supper. 

Stuff
A few random potatoes
1 pound ground beef
Some random baby carrots that needed to be used
Cajun seasoning
salt
pepper
onion powder
Coconut oil
A wedge of this GORGEOUS organic cabbage my sister in law grew up the hill at her place

I just sauteed the potatoes and carrots in copious amounts of coconut oil with some of the seasonings. I used  a lot of onion powder. Normally I would use fresh onions but I am out today. I am also out of my homemade lard which normally would be my go to fat for sauteed potatoes. I just need to buy some canning jars before I render down the insane amount of organic pig fat in the freezer. 

 When these were done I removed them (leaving the extra oil behind) and placed them in a bowl. 

Next I sauteed the beef with seasonings and a dash of Worchestershire Sauce. This was then removed from the bowl leaving the extra oil behind. 

Now I put the cut up cabbage into the pan, This was also cooked up with seasonings and added to the bowl when finished.

Everything was mixed up and served. 

 This meal was nothing special to look at. In fact it was pretty ugly and I didn't bother to take a picture. This is nourishing, home cooked food. It is not gourmet eye candy. My husband enjoyed it. My son gobbled up 2 bowls and said I could make it instead of cake on his birthday. I guess it was good. We often make a similar dish called Sausage O'hoolihan using smoked sausage in place of ground beef. You could customize this to your own taste and to use what you have on hand. It could be served on rice if you did not have potatoes. Any meat or vegetable combo you like would work well. It's all about using what you have. 


Saturday, July 25, 2015

Egg Update

 I wish I was posting a cheerful update with pictures of fluffy day old chicks. Sadly that is not happening. 

 A few days into our hatching experiment we had some strong thunderstorms come through. We experienced a 5 hour power outage. When the power returned the eggs had gotten very cool. I think this is the point where we lost most of them. 

 In a couple days if all had gone well we would have had chicks starting to peck their way to freedom. Instead I have had leaking rotten eggs. Last night when I went to mist the container for humidity one exploded. I don't think I need to explain the sensory experience I enjoyed. Let me just say I am glad I am past the morning sickness stage of pregnancy or dinner would have been lost. 

 I only have one egg that looks like it might have life in it. I will continue to watch it, remove fizzing rotten eggs and see what happens. I can't see into the dark brown shelled eggs when I candle them so maybe I will be surprised. 

 I do not think this is a incubator problem. I was able to keep the temperature almost perfect other than the night of the power outage. I would not hesitate to use this again to try and hatch eggs. Next time I would think to have a back up plan to keep the eggs warm in the event of an outage.  

Tuesday, July 21, 2015

Recycled Food A.K.A. Cook Once, Eat Twice

Chili!

I admit most people do not think of chili as a good summer meal. I happen to think it is a great summer meal because I can put it in the slow cooker. This is great if you happen to be married to one of those men who does not enjoy light summer meals. 

 I based this meal on using up produce I bought on sale, leftover meat and bean mixture from the freezer, and canned good purchased on sale. I added in a half pound of sale priced grass fed ground beef I saved from when I made pasta sauce recently. 

One tip I would like to share with you is how I save time and tears chopping veggies for things like sauces and soups. I now clean them, make them into large chunks and zip them through my little Ninja food processor. I feel it saves me time. It also makes things small so they are easier to hide from picky young eyes. 
Green peppers await their fate inside the Ninja. You're next Onions!

Completed chopped veggie mix getting a quick saute


 I was out of fresh garlic so I used some of these crazy fellows instead. These are garlic scapes. Scapes are the stalk of the garlic plant you harvest in spring. They are curly and wild looking. They have a mild garlic flavor. 

After the veggies went in the cooker I browned the ground beef. The beef joined the chicken mixture from the freezer in the slow cooker. 

Terrible blurry photo of the leftover ground chicken bean mixture frozen in a bowl. This was from a Trim healthy Mama compliant recipe called Dirt-E Rice. 

Here are the canned goods I used. I only used half the corn in the chili. 

Everything was added to the crock pot along with seasonings. I used chili powder, cumin, garlic powder, oregano, real salt and black pepper. I also tossed in 1/4 cup of lentils and 1 cup water. 

 I did not manage to get a picture of the finished product. It was a very good chili. The finely minded veggies cooked down nicely. The recycled meat worked well even with it's Cajun seasoning. Three people ate the chili for supper and we have about 3 servings left in the fridge to be used for lunch or yet again recycled into something new.

Here are some ideas for using up leftover chili
*Nachos
*Baked with corn bread on top
*Taco soup
*Chili Mac
*Baked potatoes topped with chili, cheese, sour cream, etc
*If you eat bread products, specifically processed ones you could push canned biscuit dough into muffin tins, fill with chili, top with cheese and bake to make chili biscuit cups
*Serve the chili on rice 
*Burritos


Monday, July 20, 2015

Sharpening a Knife On a Mug


 We all have some old mugs hanging around. Make them multi-task by using them to sharpen your knives.

How To Check For Complete Dehydration-Jalapeno Pepper Edition


Here I demonstrate how you can quickly tell if you have dehydrated your peppers completely. It took about 12 hours to get them this dry. It was rainy yesterday when I started the peppers and I had the dehydrator temperature too low. It probably would have taken less time if those things were not a factor. 

A Slice of Life and Dehydrated Jalapeno Peppers

This is a scene you are not likely to run into often these days. Here we are stopped for a Vermont traffic jam. This farmer rotates his cows on different pastures and to come in for milking they must cross this state road. 


Lovely blushing apples on one of our apple trees.


We have a small grocery store in our area that often has great deals on produce. It is very random what they offer on sale. This past winter they offered jalapeno peppers for .50 a pound. I love filling jalapeno peppers with cheese and baking them wrapped in bacon. I found myself with 2 gallon bags of peppers after stocking up. The only problem with all these peppers are they are taking up precious freezer space. One of the bags got open a little and ice was forming so I thought I should take action. Right now I am dehydrating the icy peppers. Once dry I am going to run them through my ninja to mince them. Once minced and stored I can add them to chili, soups, or other saucy dishes. I can also re-hydrate them to add to cheese sauces, etc. 

Just another way to stretch your food dollars and prevent waste.


Maybe sometime soon I will try and be brave and take you along for a trip to this store via video so you can see what kinds of deals I get. It is always worth checking out smaller stores in your area. Sometimes they can surprise you. 

Sunday, July 19, 2015

Reduce, Reuse, Recycle...Your FOOD!

Tonight I proclaimed that our supper was recycled. My husband instantly gave me a look of horror. He thought maybe I was dumpster diving, which apparently he thinks is horrible but I think is acceptable. I have not gone dumpster diving for dinner so he was safe. 

Instead what I did was re-purpose leftovers into a new meal, in this case pasta sauce. This is a great way to reduce food waste, and keep food boredom from setting in. Some in the cooking world call this "cook once, eat twice". This is a wonderful strategy for busy parents, or in my case a tired pregnant mom. Recycling your leftovers into a new meal can save money by stretching out smaller amounts of food or filling them out with a cheaper food. While we certainly would have eaten the rest of this pasta sauce on pasta as leftovers rice is much cheaper for me to purchase than gluten free pasta which I need for two family members. 

 This week I got a very good deal on green peppers at a small, local grocery store. I had planned to make a southwestern stuffed pepper with them using some spicy ground chicken mixture from earlier in the week.  I decided that last night's pasta sauce would be even better and to save the spicy meat to make chili. 

Here is how it went down

First my slow cooker was greased lightly with coconut oil

I set a pot of brown rice on to cook while I did the rest of the prep work. Here is the method I use for fool proof brown rice. 

The peppers were cut in half. I remove the membranes with a metal measuring spoon, a melon baller is another great tool for this. 

  
When the rice was cooked I mixed rice, leftover sauce, and some extra salt and pepper together until I liked the consistency. The sauce was just an onion, 1/2 a green pepper, a large box of sliced mushrooms, 1/2 pound of grass fed ground beef and 2 jars of pasta sauce with some extra seasoning and a hint of pepperoni. 

I stuffed the peppers with the mix and placed them in the slow cooker. I poured on some leftover crushed tomatoes and a tiny bit of water. I put this on to cook for a few hours on low. 


When the peppers looked nearly done I topped them with parmesan, mozzarella and a few slices of pepperoni. You will notice 2 peppers in the corner with no cheese. These are for my daughter who is allergic to dairy, eggs and gluten. I was VERY careful to make sure no cheese got close to her peppers. Sometimes I will use a smaller slow cooker to keep hers apart from the others. In this case I felt there would not be a problem. 


The peppers cooked until the cheese was melted. Here is the finished product. I ate two and they were great. For anyone who cares this is a Trim Healthy Mama cross over meal. 


Up next: Recycled Chili 

Friday, July 17, 2015

Frugal Meal: Sausage Pasta and Salad

I did not have cheese on my food so that is not pictured

One of my tips for saving money on food is to shop stores that offer a discount on dairy, bread, meat and produce that needs to be sold that day. I often am able to find some great deals and stock up when I can. 

 I usually try to feed my family a diet of whole foods. I am 24 weeks pregnant and try to eat the Trim Healthy Mama way at least 75% of the time. I am not perfect with either and  you will see that in my meals. 

 On this day I ran across packages of Spicy Italian Chicken Sausage. Bonus it was the natural variety with no yucky hormones, chemicals, etc! I paid a dollar and change for each package. I have 2 gluten free people so I have to spend a little more on pasta for them. This day I scored a box of gluten free pasta for .89. I usually would not purchase this brand because it is only an 8oz box and it is not worth the normal price. The rest of us had whole wheat pasta which I purchased for $1. 

 I purchased 2 cans of cheap Hunt's pasta sauce for $1 each. I do not love the ingredients but it actually is one of the lower sugar varieties. It also does not contain any of my daughter's allergens. 

At home I added a salad of free greens from my garden, with a few pennies worth of carrots and cucumbers. I also had a pepper from my garden and cheese that I made for pennies from our own goat's milk and milk I get from WIC. 

 To cook I cut each sausage into 4 pieces and browned in some coconut oil to make little sausage balls. I added the sliced pepper to this and cooked a bit more. 

Unattractive sausage cutting shot 


 I drained off some grease and added in the sauce. I also added about 1 cup of crushed tomatoes from a can I purchased for .89. The sauce was seasoned with some extra garlic, onion powder and Italian seasoning. 


 The sauce cooked for about an hour and was served on pasta with cheese, salad and some green beans which I purchased on sale previously. 

Total meal cost approximately 
6.50

This meal fed 3 teens, 2 adults and allowed 3 meals of leftovers for my husband who eats enough for 2 people. I did have to cook some extra gluten free pasta for the left over meals but that is ok. 

Thursday, July 16, 2015

$24 Dollar Emergency Chicken Egg Incubator

 Vanilla is a cute little bantam hen. Vanilla decided she wanted to be a mother. She REALLY wanted to be a mother badly in fact. Vanilla was sitting on a clutch of almost 20 eggs, mostly standard sized hen eggs. She happened to be hogging the only nest box. 

I was not sure how this would all play out but I have always wanted to see the natural process of a broody hen hatching eggs. So I did all I could to facilitate Vanilla's motherly desires. I placed a box with hay in the coop as an extra nest box to help my other ladies get by. They were not impressed. Some ladies took their egg laying business elsewhere; leaving me short of eggs. Other slightly less polite hens would push Vanilla out of the nest. To add insult to injury once in the nest they were destroying and eating eggs. This may have been a blessing in disguise since in reality Vanilla only should have had about 6 standard eggs under her. 

 I had decided at this point to candle the eggs to see which seemed viable. All seemed to have development. I figured if they other hens continued to be a bother I would move Vanilla and her unborn brood elsewhere but I had to figure out where. 

Sadly the next day when I opened the coop door out popped Vanilla to dust bathe. She never looked back. The egg eaters were in the nest so I shooed them away and collected the eggs. I kept the eggs warm under the fan of my dehydrator while I did my research and bought supplies to make the following homemade incubator. 

What you need:
Foam cooler (the hardest item to find)
Battery operated digital thermometer with temperature and humidity reading (don't forget batteries)
Small extension cord
Small light socket with electric plug end
Light Bulb (mine is a 40 watt appliance bulb)
Duct tape
Rubber Dish Mat
Tray to fit inside cooler (I used an old cake pan)
Sponge
Small dish
Glass from picture frame


I purchased the electrical items from a hardware store, the cooler was found at a drug store, the rest of the items are from Dollar Tree or salvaged from home. The thermometer was the most expensive purchase but even if we just tossed this incubator (we won't!) we could use the thermometer so it is not a total waste. 

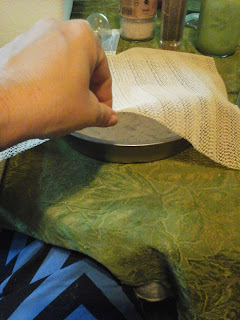
1. Wrap dish mat around your pan and secure using plenty of duct tape. This will be a little hammock for your eggs. You can put water in the pan to help with humidity. 


2. Measure and cut hole for the bulb socket. Be careful, I cut mine too large and needed to tape a strip of the rubber mat around it to make it secure. You could also use glue (school glue NOT super glue it will eat the foam) to secure the bulb. I did not find it necessary to glue it in. Install your bulb.


3. Figure out how your pan will fit inside and insert it. Mine was larger than the bottom so it is jammed down into the container in a way that it is secure in the middle of the cooler. This is great because heat rises. If your pan fits on the bottom that is great too. 


4. Tape your thermometer to the inside of your cooler securely. Plan where your window will be so that you can see the thermometer without the light blinding you or having to open the lid more than needed.


5. Place your container where you will keep it for the next 3 weeks or however long you still need to incubate your eggs. Plug in your light to test.

6. Place a sponge in a small dish full of water to help with humidity levels. Mine is placed on top of an old tea cup to put it closer to the light bulb. 

7. I made my window in the cover of my cooler because of the tray being up high. I used a broken piece of glass from a frame. If your tray is on the bottom of the cooler you will want to cut and tape in your window BEFORE installing your thermometer, placing your pan, etc. 


8. Now you can add your eggs to the tray and turn on the light. I have the letter A (side A) on each egg. This lets me keep track of what way to turn my eggs.


How it worked

I found that keeping the lid closed all the way was too hot. You will want your incubator to stay around 100 degrees and your humidity should be around 50% at least. I tried making air holes to keep the temp down but it did not help. On hotter days I need to keep it open more than cooler nights. 

 I am having trouble keeping the humidity level up because of the cover being open. I have kept a spray bottle of water near the container. I spray the eggs and inside the container (not near the bulb!) as often as possible. I am thinking I might try putting some plastic wrap over the open part. I think the plastic food wrap will allow heat to escape but moisture to stay in. 

Sadly a couple nights into this experiment we had a 5 hour power outage. When the power came back on it was only 65 degrees in the incubator. I am not sure if the eggs can stay viable that long being that cool. I plan to candle the eggs this weekend and see what they look like. I will keep the eggs going and see what happens regardless.